Обзор и тест wd my book live duo объемом 4тб
Содержание:
Внешний вид и комплект поставки
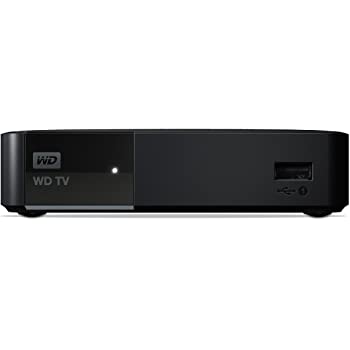
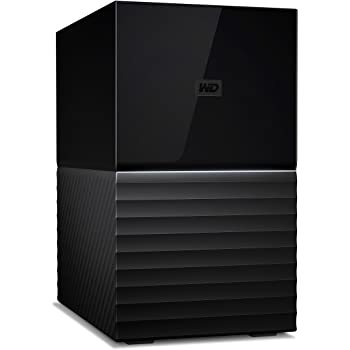
Внешне LiveDuo, выполненный в корпусе из черного матового пластика,очень похож на однодисковых собратьев. Как и у них, передняя панель Duo оборудована одиноким светодиодом, который меняет цвет и моргает в зависимости от текущего статуса устройства.
Задняя панель Live Duo отличается от однодисковых версий наличием порта USB2.0. С его помощью к устройству можно подключать накопители для общего доступа к ним или для создания резервных копий. А вот подключение принтеров не предусмотрено.
Помимо порта USB на задней стенке мы видим стандартный набор для сетевых накопителей: порт Ethernet для подключения к локальной сети, разъём подключения питания, кнопочку перезагрузки и отверстие Kensington Lock.
В комплект поставки входит всё только самое нужное и ничего лишнего:
- Собственно накопитель
- Сетевой адаптер питания
- Патч-корд
- Диск с ПО
- Краткая инструкция по установке
Функционал
Изначальный набор функций, присутствовавший в My Book Live здесь был немного урезан. Например здесь нет поддержки подключения принтеров, поддержки домена Windows, управления jumbo frames и т.п.
Их того что осталось можно отметить:
- поддержка файловых систем SMB/ICFS
- поддержка AFP (для Apple Time Machine)
- поддержка NFS (только для общих ресуров)
- FTP-сервер
- Создание резервной копии
- ПО SmartWare для Windows в комплекте
- Распределение прав пользователей (но нет распределения по группам и квотирования)
- Управление по HTTP (не HTTPS)
- Сервер iTunes, uPnP, DLNA
- Оповещения по электронной почте (встроенный smtp-сервис)
- Удаленный доступ к общим ресурсам через облачный сервис WD2go
- Приложение WD Photos для iOS
Веб-интерфейс Live Duo выполнен на ajax, в виде набора панелей управления. Но и здесь у Live Duo есть пара отличий от Live.
Например медиасервер TwonkyMedia заменен на DLNA Media Server.Сервер iTunes на месте, но для него доступны только функции “Enable” (включить) и “Rescan” (просканировать накопитель на наличие медиаконтента).
Изменилось и меню “Storage”. Здесь видно также, что я подключил WD MyBook 3.0 к порту USB2.0.
Наконец то WD заменили свой убогий жадный до денег сервис удаленного доступа MioNet на новый облачный сервис WD2go. Если говорить в двух словах, то WD2go НАМНОГО лучше.
Ещё одним приятным дополнением стала новая функция резервного копирования “Safepoint”. Резервная копия всего содержимого накопителя сохраняется по расписанию или вручную, при дальнейших синхронизациях происходит инкрементное обновление. Место хранения резервной копии можно указать в любой общей папке локальной сети или на подключенном по USB накопителе.
Резервное копирование производится банальным копированием всего содержимого накопителя в указанную папку, всё хранится в открытом виде в оригинальном формате с сохранением структуры папок. В таком способе есть как плюсы так и минусы.
Полезности
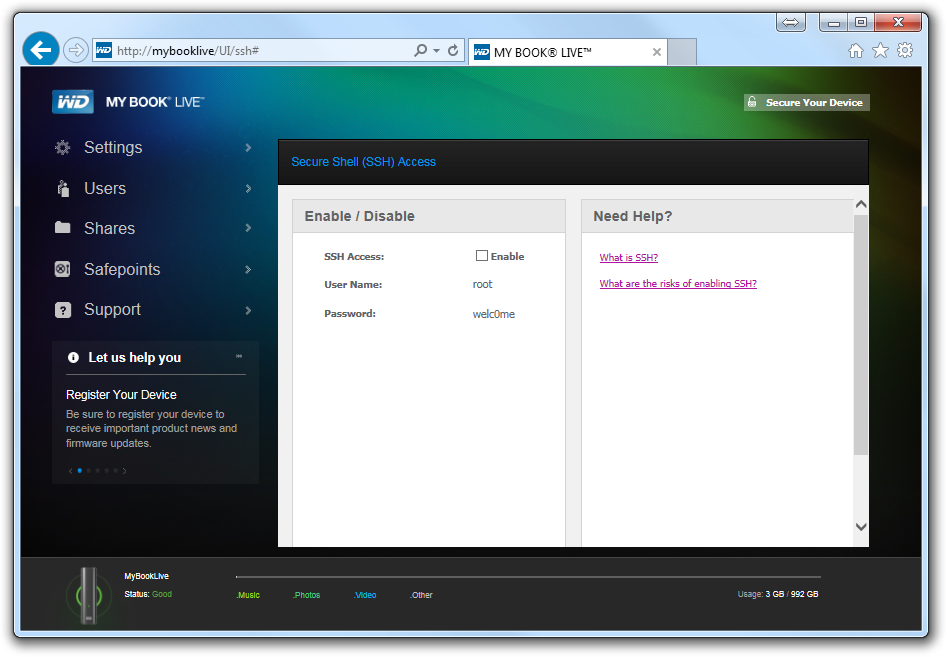
Перейти по адресу http://mybooklive/UI/ssh и активировать соответствующую опцию. Логин root, пароль welc0me.
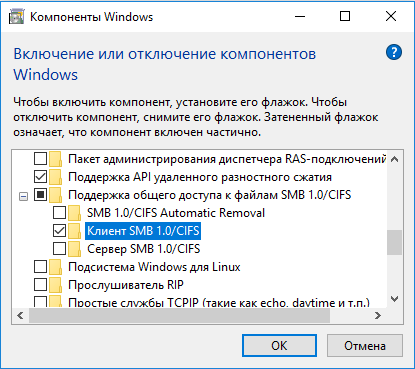
Не видно устройство в Windows 10
Помог совет с форума WD
Панель управления → Программы → Программы и компоненты → Включение или отключение компонентов Windows → Клиент SMB 1.0/CIFS
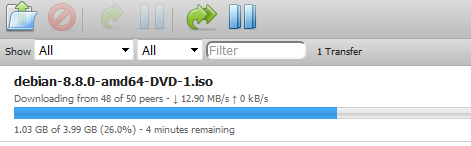
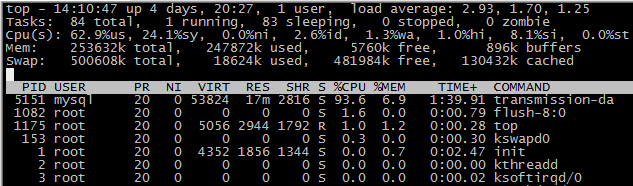
Интерфейс гигабитный, но выше 13 МБ/с скорость не поднимается.
LA высокий.
chroot среда (копипаст)
Установка
wget --no-check-certificate https://github.com/MyBookLive/chroot/raw/master/install.sh
sh ./install.sh

 Info: This script will guide you through the chroot-based services
 Info: installation on Western Digital My Book Live (Duo) and My Cloud NAS.
 Info: The goal is to install Debian jessie environment with no interference
 Info: with firmware. You will be asked later about which services to install
 =>  Do you wish to continue [y/n]?
Через N минут
 Info: A Debian jessie chroot environment installed.
 Info: Now deploying services start script...
 Info: ...finished.
 =>  Do you wish to install miniDLNA UPnP/DLNA server [y/n]?n
 =>  Do you wish to install Transmission BitTorrent client [y/n]?y
 Info: Transmission is installed.
 Info: Congratulation! Installation finished. You've got a working
 Info: Debian jessie environment onboard. You may install any services
 Info: you wish, but don't forget to add it's names to
 Info: /DataVolume/debian/chroot-services.list
 Info: /etc/init.d/chroot_debian.sh script is used
 Info: to start or stop chroot'ed services.
 Info: Found bug? Please, report us!
 Info: https://github.com/MyBookLive/chroot/issues
Переходим в chroot окружение
WD:~# /etc/init.d/chroot_debian.sh start
CHROOT servicess seems to be already started, exiting...
# chroot /DataVolume/debian
Проверяем версию Debian
(chroot-debian)/# cat /etc/debian_version
8.9
(chroot-debian)/# cat /etc/issue
Debian GNU/Linux 8 \n \l
Прошивки
-
My Book Live Firmware Version 02.43.10 — 048
-
My Book Live Firmware Version 02.43.09 — 038
-
Чтобы включить медиасервер WD: WDMediaServerPatch.deb | зеркало rtfm.wiki
-
Чтобы включить медиасервер TwonkyMedia: Twonky5MediaServerPatch.deb | зеркало rtfm.wiki
0x80070035
-
https://community.wd.com/search?q=0x80070035%20order%3Alatest_topic
-
2018
Для возрождающих коммунизм MyBook в 2018 году
Скрипт для chroot не скачивается
OpenSSL: error:1407742E:SSL routines:SSL23_GET_SERVER_HELLO:tlsv1 alert protocol version
Unable to establish SSL connection.
Можно загрузить иными способами install.sh на MyBook, но как потом в итоге оказалось не создаются init скрипты.
Мне удалось решить это всё простой подменой более свежей версии wget. Качаем отсюда пакет wget_1.13.4-3+deb7u2_powerpc.deb
Не стал устанвливать через dpkg, а просто извлек через 7z один бинарник и скопировал в /usr/bin.
Кстати обновить потом Debian 8 до 9 нельзя т.к. powerpc более не поддерживается.
idle3ctl: отключение парковки головок диска
wget http://mybookworld.wikidot.com/local--files/mybook-live/idle3ctl.tar.gz
tar zxvf idle3ctl.tar.gz
./idle3ctl -d /dev/sda
reboot
Notes for My Book Live Duo
Drive enumeration
Contrary to Western Digital documentation and nomenclature, the MBL Duo hardware enumerates its SATA ports beginning from the right: When viewed from the front, SATA port 0 is located in the right bay (“Drive B” in the manual), SATA port 1 in the left bay (“Drive A” in the manual). If disks are inserted in both bays, the disk in the right bay is assigned , the disk in the left bay . OpenWrt will mount its root on , consequently boot will fail if the disk in the right bay does not contain OpenWrt. If both disks contain OpenWrt, all changes to its configuration will be made to the disk in the right bay.
When used with two disks, the MBL Duo requires the disk in the right bay (“Drive B” in the manual) to contain OpenWrt.
If only one disk is inserted it will be assigned regardless of the drive bay it is in. It is actually possible to hot-plug a disk into the other drive bay on a running system, but keep in mind that if you hotplug to the right drive bay, device enumeration will change after a reboot.
Older nonfunctional builds
OpenWrt builds prior to 18.06 or snapshot r7526 (dated 2018-07-16) do not work correctly on an MBL Duo. It will fail to boot (boot loop) if two disks are used and either contains anything other than the two default OpenWrt partitions.
OpenWrt builds prior to 18.06.2 or snapshots dated 2018-08-30 would, if both inserted drives contain OpenWrt, load kernel and dtb from SATA 1:1 (the disk in the left bay) while mounting the rootfs on SATA 0:1 (the disk in the right bay). This leads to problems if the version of OpenWrt differs between the two drives, for example after a sysupgrade; The kernel would mismatch and the system will, at best, not work properly.
Both issues have since been remedied, it is advisable to only use or upgrade to a version newer than the ones affected (i.e., 18.06.2 or later).
Общее
MyBookLive замечательный (для своего времени) NAS от Western Digital. Даже обзаведясь самым простым Synology DS110j где есть навороченный интерфейс (DSM, онлайн демо) могу сказать, что WD куда приятнее, даже несмотря на то, что многие вещи делаются из консоли.
Интерфейс неподготовленного человека может просто культурно убить. Это как если вы использовали долгое время iOS 6 и он вам нравился, а потом пришёл господин ДжониКейджАйв и показал вам новый iOS 7 где всё очень пёстрое, яркое, и отдаёт глянцевым блеском так, что вы меняете глаза или достаёте их из бэкапа. Интерфейс Synology если говорить мягко на любителя. Ясно, что это устройство для тех кто отвалил пару десятков тысяч русских денег и хочет воткнуть в розетку и сразу пользоваться. Но с простым интерфейсом лучше уж приобрести TimeCapsule.
Много полезных ссылок
-
Эпопея о WD My Book Live, или «девайс-конфетка» с «печеньками»
-
WD MyBook Live — расширение стандартной функциональности
-
http://www.ekzorchik.ru/?s=wd
-
Обсуждение NAS Western Digital My Book Live / ixbt
-
NAS WD My Book Live и NAS WD My Book Live DUO / ixbt
-
WD My Book / My Cloud / 4pda
-
Официальный форум wdc
-
https://mybooklive.nethouse.ru/iptv
-
https://mybooklive.nethouse.ru/parkovkawd
-
http://wdnas.ml/wd/Book/
-
https://github.com/MyBookLive
-
https://sites.google.com/site/wdmybooklivesimplehacks/hard-drive-diagnostics
ПО в MyBookLive очень старое. Debian Lenny и ядро 2.6.32
MyBookLive:~# uname -a
Linux MyBookLive 2.6.32.11-svn70860 #1 Thu May 17 13:32:51 PDT 2012 ppc GNU/Linux
MyBookLive:~# cat /etc/debian_version
5.0.4
Ни в коем случае не надо пробовать что-то обновить или установить через ssh. Потому-что вместе с NAS идёт в комплекте ружье, которое по инструкции надо повесить на стену. И оно обязательно когда-нибудь выстрелит вам в коленку если вы будете apt-getить.
Большое спасибо гражданину Alexander Ryzhov, который сделал доступным всем обновление до Debian Jessie через chroot-окружение.
Начинка
Если снять пластиковую крышку, то можно получить доступ к внутренностям устройства. А внутри мы видим жесткую металлическую корзину с местами для установки двух дисков и процессорную плату между ними. Корзина собрана на заклепках и разбору не подлежит.
По счастливой случайности веб-интерфейс устройства позволяет сгенерировать и сохранить логи. Расшифровать логи Linux оказалось несложно, а в них можно найти перечень компонентов, на которых построен накопитель. В принципе ключевые компоненты WD Live Duo практически не отличаются от накопителей WD Live, даже не смотря на то, что плата здесь другая.
Единственное различие в том, что в Live Duo используется 800Мгц процессор, тогда как в Live установлен процессор с частотой 1Ггц. Объем оперативной памяти аналогичен, 256Мб. Гигабитный порт Ethernet обслуживает чип Broadcom BCM54610, поддержки Jumbo Frames в нем нет.
Внутри устройства установлены два жестких диска “зеленой” серии от WD объёмом по 2Тб (модель WD20EURS).
При работе Live Duo потребляет всего 15Вт, а в простое и того меньше, 5Вт. Промежуток времени после которого накопитель уйдёт в режим экономии энергии можно настраивать.
Активного охлаждения нет, поэтому устройство работает очень тихо.
Отказоустойчивость
Режим RAID1 позволяет зеркалировать данные для обеспечения их сохранности в случае отказа одного из дисков. Проверим как поведет себя WD Live Duo если выдернуть один из дисков, сымитировав его отказ.
Для начала я запустил копирование большой папки с файлами, затем немного выждав вытащил один жесткий диск. Почти сразу же копирование приостановилось секунд на 40 и затем продолжилось. О неполадке сразу сообщил светодиод на передней панели, замигав желтым светом. При входе в панель веб-интерфейс наблюдаем следующую картину…
Перейдя в панель “Storage” смотрим подробности…
Ну и напоследок через несколько минут на электронную почту примчалось письмо с оповещением об отказе одного из дисков.
Процедура восстановления описана в инструкции. Надо отключить устройство, вставить жесткий диск, затем включить устройство. После загрузки видим, что данные в целости и сохранности. Какое то время в веб-оболочке диск ещё остается помечен как “Bad”, но через несколько минут всё встает на свои места. В админке. Но светодиод продолжает моргать желтым, для того чтобы привести его в чувство надо отключить питание (выдернув кабель) и включить питание обратно.
Уведомлений по результатам восстановления на электронную почту не приходит.
В целом автоматическое восстановление данных при отказе диска работает. Немного смущают только танцы с бубном в борьбе с индикаторами, WD ещё есть над чем поработать.
Производительность
В тестах принимал участие накопитель Live Duo с прошивкой 02.30.19-277.
Тесты проводились в режиме RAID1 и JBOD. Замеры производились средствами ОС и с помощью утилиты Intel NAS Performance Toolkit.
Показатели скоростей записи и чтения в режиме RAID1 оказались чуть поменьше, чем в режиме JBOD, что неудивительно.
Любопытно, но при замерах в Intel NASPT результаты получились значительно ниже. Выходит тестовые программы не отражают реальной ситуации.
Посмотрим как же эти результаты смотрятся по сравнению с другими сетевыми накопителями.
По сравнению с другими накопителями результаты не очень радуют, но не стоит забывать смотреть на цену устройства, которая окажется намного выгоднее, а что до скоростей… то даже таких скоростей вполне хватит большинству простых пользователей.
Compare with similar items
|
This item WD 20TB My Book Duo Desktop RAID External Hard Drive — USB 3.1 — WDBFBE0200JBK-NESN,Black |
WD 8TB Elements Desktop Hard Drive — USB 3.0 — WDBWLG0080HBK-NESN |
Seagate Desktop 8TB External Hard Drive HDD – USB 3.0 for PC Laptop and Mac (STGY8000400) |
WD Black 5TB P10 Game Drive Portable External Hard Drive Compatible with PS4 Xbox One PC and Mac WDBA3A0050BBKWESN |
Seagate (STEL10000400) Backup Plus Hub 10TB External Hard Drive Desktop HDD – USB 3.0, for Computer Desktop Workstation PC Laptop Mac, 2 USB Ports 2 Months Adobe CC Photography |
WD Black 8TB D10 Game Drive Desktop External Hard Drive Compatible with PS4 Xbox One PC and Mac 7200 RPM WDBA3P0080HBKNESN |
|
|---|---|---|---|---|---|---|
| Customer Rating |
4.2 out of 5 stars (4167) |
4.6 out of 5 stars (57141) |
4.6 out of 5 stars (29171) |
4.8 out of 5 stars (3295) |
4.3 out of 5 stars (4732) |
4.5 out of 5 stars (246) |
| Price |
From $434.99 |
$144.99$144.99 |
$134.99$134.99 |
$124.99$124.99 |
$203.34$203.34 |
$199.99$199.99 |
| Sold By |
Available from these sellers |
Amazon.com |
Amazon.com |
Amazon.com |
Amazon.com |
Amazon.com |
| Compatible Devices |
Desktop |
Mac, PC |
Laptop, Desktop |
Xbox One, Playstation 4, PC, Mac |
Laptop, Desktop |
Xbox one; Playstation 4 Pro; Windows 8.1, 10; macOS 10.11+ |
| Digital Storage Capacity |
20 TB |
8 TB |
8 TB |
5 TB |
10 TB |
8000 GB |
| Hard Disk Description |
Desktop |
Desktop |
Desktop |
Portable |
Desktop |
Desktop |
| Hard Disk Size |
20.0 TB |
8 TB |
8 TB |
5.0 TB |
10.0 TB |
8.0 TB |
| Hardware Interface |
USB |
USB, USB 2.0, USB 3.0 |
USB 3.0 |
USB 3.0 |
USB |
USB |
| Item Dimensions |
6.30 x 3.94 x 7.09 inches |
5.31 x 1.89 x 6.53 inches |
7.06 x 4.65 x 1.63 inches |
4.65 x 3.46 x 0.82 inches |
4.64 x 1.61 x 7.80 inches |
7.68 x 4.92 x 1.73 inches |
| Item Weight |
5.25 lbs |
2.09 lbs |
2.43 lbs |
0.51 lbs |
2.34 lbs |
2.16 lbs |
| Memory Storage Capacity |
2 TB |
8 GB |
— |
5000 GB |
1 TB |
8 TB |
| Model Year |
2017 |
— |
— |
— |
2017 |
— |
| Size |
20TB |
8TB |
8TB |
5TB |
10TB |
8TB |
2017: WD My Book Duo
23 августа 2017 года компания Western Digital представила накопитель для хранения фотографий, видео, документов и музыки My Book Duo.
 Накопитель My Book Duo, (2017)
Режим RAID-0 обеспечивает быстродействие со скоростью последовательного чтения на уровне 360 МБ/с (через порт USB Type-C). Изменение конфигурации накопителя на режим RAID-1 обеспечит резервирование данных, их зеркалирование на диски WD Red емкостью 20 ТБ.
Программное обеспечение WD Drive Utilities (в комплекте поставки) помогает настроить диски в конфигурацию RAID-1 для обеспечения избыточности данных (зеркалирование данных) или использовать как два отдельных диска (JBOD).
В составе накопителя My Book Duo оптимизированные для RAID диски WD Red. Они обеспечивают скорость работы и надежность. Поддерживаются стандарты USB 3.1 и USB 3.0/2.0. В комплекте поставки кабели с USB Type-C на Type-C и с Type-C на Type-A.
Наличие портов USB 3.0 Type-A позволяет подключить дополнительный накопитель, клавиатуру, мышь, устройство чтения карт, USB. Накопитель My Book Duo можно использовать как док-станцию. Он помогает заряжать и синхронизировать телефон.
Устройство имеет встроенный функционал аппаратного шифрования на основе алгоритма AES с 256-битным ключом. ПО WD Security помогает безопасно хранить данные.
Характеристики и свойства
- Форматирование в файловой системе NTFS обеспечивает совместимость с Windows 10, Windows 8.1/8.0 и Windows 7 без дополнительной настройки.
- Интерфейс — USB 3.1 Gen 1 (совместим с USB 3.0)
- Готовая к использованию конфигурация RAID-0.
- Оптимизированные для RAID диски WD Red
- 2 порта концентратора USB 3.0 Type-A
- Аппаратное шифрование на основе алгоритма AES с 256-битным ключом и защита паролем
- Ограниченная 3-летняя гарантия.
Комплект поставки
- Настольный накопитель My Book Duo для массивов RAID
- Программное обеспечение WD Discovery для WD Backup, WD Security и WD Drive Utilities
- Кабель с USB-C на USB-C
- Кабель с USB-C на USB-A
- Сетевой источник питания
- Инструмент для замены дисков
- Памятка по установке и настройке
Installation
| Model | Version | Current Release | Firmware OpenWrt Install | Firmware OpenWrt Upgrade | Firmware OEM Stock |
|---|---|---|---|---|---|
| MyBook Live | Duo | 19.07.3 | |||
| MyBook Live | Single | 19.07.3 |
Warning: By installing OpenWrt, you will lose all existing data on your disk(s).
Their MBR (master boot record) containing the partition table will be overwritten.
In addition, the original Western Digital firmware’s disk format uses a nonstandard 64 kB block size, rendering the data inaccessible to OpenWrt and most other systems.
Back up your data to another drive before installing OpenWrt.
Builds for the MBL Duo prior to 18.06 (or snapshot r7526 dated 2018-07-16) contain a bug that prevents proper operation if two disks were used and either contained anything other or more than the default OpenWrt partitions. Although an official 17.04 build exists, for all intents and purposes, MBL Duo support started with OpenWrt 18.06. Please see also the notes for MBL Duo below.
Remove the disk from their enclosure (easy on MBL Duo, a bit more elaborated on MBL Single) and connect it to a host computer running Linux. Download the OpenWrt firmware image to your host computer.
Note: Up to OpenWrt 18.06, firmware images existed in two flavors, for the Duo and “not-duo” for the Single. In 19.07 and later there is only one firmware image that works with both Single and Duo variants – use the image for an initial installation and the image for updates.
the downloaded file to receive the image file ending in . Write this image file to the MBL disk using
# dd if=<image>.img of=/dev/sdx bs=64k
This usually requires root privileges on your system. Replace with the actual device the MBL disk is attached to.
Warning: This overwrites the target disk with a new MBR (master boot record) and a new partition table. You will lose all existing data on the target disk. If you choose the wrong device, you may accidentally overwrite your system disk or another disk you may care about, so double and triple check to make sure you are writing to the correct disk.
Re-insert the disk into their enclosure. Like with other single-port OpenWrt devices, the ethernet port will by default be assigned to the LAN interface with static IP 192.168.1.1 and serving DHCP. You can now proceed to configure OpenWrt to your liking, add further partitions to the disk and install additional packages.
Additional disk partitions
Writing OpenWrt to a disk creates two default partitions:
Number  Start (sector)    End (sector)  Size       Code  Name
   1            8192           24575   8.0 MiB     8300  Linux filesystem
   2           32768          557055   256.0 MiB   8300  Linux filesystem
or in Snapshots after 2019/06/25:
Number  Start (sector)    End (sector)  Size       Code  Name
   1            8192           24575   8.0 MiB     8300  Linux filesystem
   2           32768          294911   128.0 MiB   8300  Linux filesystem
The My Book Live being a NAS, you will probably want to use the rest of your significantly larger disk. It is tempting to simply enlarge the second (“rootfs”) partition to the end of the disk, but you would lose the ability to sysupgrade later – sysupgrade would reset the partition to its default size and you would lose all additional data. The correct way is to create one or more additional partitions using (MBR) or (GPT for disks larger than 2TB) and, using , mount them into the file system where needed.
The recent change in the default rootfs partition size suggests that the size of the default partitions should be considered somewhat variable. For this reason it is sensible to start additional partitions not completely flush to the default partitions but rather with a bit of buffer inbetween (for example, starting the 3rd partition at sector 2097152, 1GB into the disk). This allows default partitions in future versions to expand without the danger of overwriting the beginning of an additional partition.
This how to video is performing the steps explained here with some brief performance review
Upgrading
Before upgrading
Before upgrading, always take down the data of your current partition table layout!
Use the command
fdisk -l /dev/sda
to print your current partition layout, and save a copy of the data for safekeeping. (Note: fdisk can display GPT partitions, you can also substitute here.) Take particularly good note of the partition data for any additional partitions you created on your drive (begin sector, end sector, type code.) There is a reasonable chance you might have to recreate the additional partitions after upgrading.
The reason to do this is that the partition table will be reset to the default MBR partition table if
- you upgrade on a disk with GPT partition table
- you upgrade from OpenWrt 17.01 or a snapshot dated before 2017-12-14
- the default partition sizes differ between your old and the new OpenWrt version (for example, the second “rootfs” partition changed size from 256MB to 128MB in snapshot builds after 2019-06-25), sysupgrade will notice that the partition layout has changed and write a full image to disk, indiscriminately overwriting the current partition table.
In any of these cases you will have to recreate the partition table with the exact same parameters after upgrading.
Upgrading
OpenWrt on the MBL can be upgraded using the LuCI web interface and sysupgrade on the shell. Both directly take a gzipped image file ending in which does not have to (and due to memory constraints probably shouldn’t) be unzipped. Newer snapshot builds come with and images, the latter should be used to upgrade.
Recreating missing partitions
After sysupgrading, again use
fdisk -l /dev/sda
to print the current partition table layout and compare with your previously saved partition layout data. Ideally, if your disk is using MBR and the default partition sizes did not change, sysupgrade will have retained your additional partitions and you are good to go.
However, you might only see the two default partitions. In this case you will have to recreate the additional partitions in the partition table. First, compare the size of /dev/sda2 to see if it has changed after a sysupgrade:
If the size of the default partitions has changed (MBR and GPT)
Use (on MBR disks) or (on GPT disks) and recreate your additional partitions with the exact same begin sector, end sector, and type code (usually 83 for “Linux filesystem), just like you did when you originally created your partitions.
With an MBR disk and you can simply append the missing partition data with the exact same parameters. After re-creating additional partitions, fdisk will recognize that the new partitions already contain a file system and ask you if you want to reset it – which you should decline.
With GPT, will ask you beforehand:
Found valid MBR and corrupt GPT. Which do you want to use? (Using the
GPT MAY permit recovery of GPT data.)
   1 - MBR
   2 - GPT
   3 - Create blank GPT
You should answer 1 here to carry over the parameters of the new default partition sizes from MBR, and then proceed to create a GPT partition table with your additional partitions.
When you’re done, write the partition table to disk and reboot. Your missing partitions should be restored with all of the data
On a GPT disk, if the default partitions are unchanged
If you previously used GPT on your disk, and the two default partitions did not change (compare carefully!), you can simply restore your old GPT partition table.
will ask you:
Found valid MBR and corrupt GPT. Which do you want to use? (Using the
GPT MAY permit recovery of GPT data.)
 1 - MBR
 2 - GPT
 3 - Create blank GPT
Here you can choose 2 to restore the backup GPT, write the partition table to disk, and reboot.